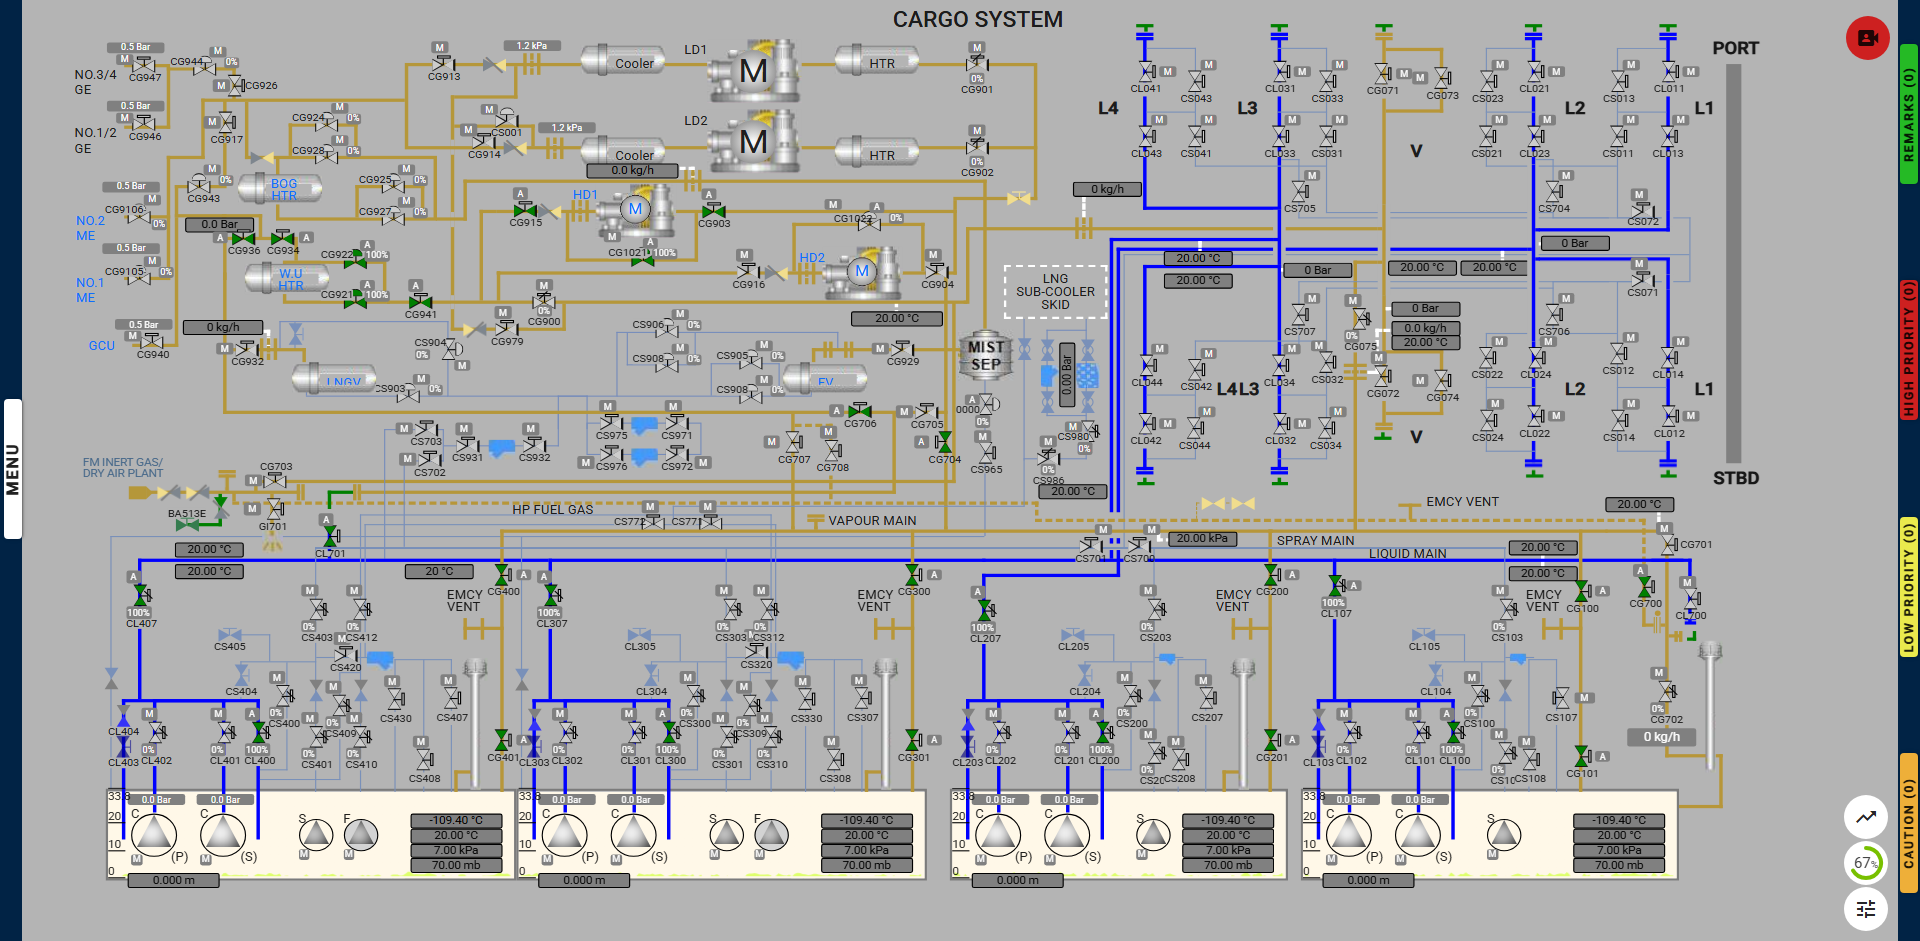
Exercise Milestones:
- Learning and Training Phase – Pre-Requisites for the start of operation:
- Insert “Emergency Vent” labelled Spool Pieces on Cargo Tank Vapour Domes and Emergency Vent Line.
- Insert the 3-way Spool Piece connecting the Vapor line to the Liquid Line.
- Set the cargo tank vapour valves.
- Set the cargo tank liquid valves.
- Set the HD compressor valves.
- Set the Vapour Line WU Heater outlet to the Liquid Line Isolating Valves.
- Set the warm-up heater valves.
- Set the Emergency Vent Line to No.1 Vent Mast Valves.
- Prepare the warm-up heater for use.
- Prepare generators and the HD compressor for use.
- Assessment Phase – Operational flow and Assessment:
- Start the HD compressor.
- Achieve 40°C in Warm-Up Heater Outlet Temperature.
- Monitor the Cargo Tanks Pressure and Temperature.
Actions During the Exercise:
Deviation from Exercise:
- After starting or resuming the operation, do not open any non-required valves or close any required valves.
- If this occurs, a caution message will be displayed, instructing the user to undo the previous action.
- Failure to correct the action will result in the exercise being terminated.
Not Maintaining HD Compressor Flow:
- During the initial 5-minute phase, maintain the HD compressor flow between 5,000 m³/h and 6,000 m³/h.
- After receiving the Alarm, ensure the HD compressor outlet flow is increased. To be maintained between 11,500 m³/h and 12,500 m³/h.
- Failure to maintain the flow will trigger alarms, with a high-priority alarm if the issue persists.
- If the high-priority alarm is not resolved within one minute, the exercise will be terminated.
Not Opening the Warm-Up Heater Bypass Valve:
- During the initial phase, open the steam outlet bypass valve of the warm-up heater within 1 minute of being prompted.
- Failure to open the valve will trigger an LAHH alarm, giving the user one minute to correct it.
- If the valve is not opened within this time frame, the exercise will be terminated.
Alarms & Remarks
| Alarm Condition |
Alarm Time |
Alarm Level |
Alarm Title |
Alarm Description |
|
|
remark |
Preparing Of Warm Up Heater |
Generally, the Warm-up heater is kept ready few hours prior to the operation. |
|
|
remark |
Open Warm Up Heater Drain Bypass Valve |
Open the Warm Up Heater Drain Bypass valve immediately. |
|
|
remark |
Valve CG922 To Auto Mode |
Set the valve output set value to 40 and change the valve to auto mode. |
|
|
remark |
Reduce Warm Up Heater Vapour Outlet Temperature |
Adjust the valve CG 922 to reduce the WU heater Vapour outlet temperature to 40°C |
|
|
caution |
Maintain Warm Up Heater Flow |
Adjust the HD compressor Veins and maintain the warm-up heater outlet flow between 11,500 kg/h to 12,500 kg/h. |
|
|
remark |
Run HD Compressor At 0 Veins |
Run HD Compressor at 0 veins for the first 5 minutes. |
|
|
caution |
High Pressure Inside Cargo Tanks |
Start the LD Compressor to reduce the pressure. |
|
|
caution |
High Pressure Inside Cargo Tanks |
Start another LD Compressor to reduce the pressure. |
|
|
caution |
High Pressure Inside Cargo Tanks |
Start GCU to reduce the pressure. |
|
|
caution |
Deviation Detected |
Deviation from the exercise is detected, undo your last action. |
Step By Step Procedure
- Learning and Training Phase – Pre-Requisites for the start of operation:
- Insert “Emergency Vent” labelled Spool Pieces on Cargo Tank Vapour Domes and Emergency Vent Line:
Connect 4 spool pieces on each of the four cargo tank vapour domes.
Connect the “Emergency Vent” spool piece on the emergency vent line.
- Insert the 3-way Spool Piece connecting the Vapor line to the Liquid Line:
Insert the 3-way spool piece connecting the Vapour line to the Liquid Line.
- Set the Cargo Tank Vapour Valves:
| Valve |
Action |
| CG100 |
Open |
| CG101 |
Open |
| CG200 |
Open |
| CG201 |
Open |
| CG300 |
Open |
| CG301 |
Open |
| CG400 |
Open |
| CG401 |
Open |
- Set the Cargo Tank Liquid Valves:
| Valve |
Action |
| CL100 |
Open |
| CL107 |
Open |
| CL200 |
Open |
| CL207 |
Open |
| CL300 |
Open |
| CL307 |
Open |
| CL400 |
Open |
| CL407 |
Open |
- Set HD Compressor Valves:
| Valve |
Action |
| CG704 |
Open |
| CG903 |
Open |
| CG1021 |
Open |
| CG915 |
Open |
- Set the Vapour Line WU Heater outlet to the Liquid Line Isolating Valves:
| Valve |
Action |
| CL701 |
Open |
| CG706 |
Open |
- Set Warm-Up Heater Valves:
| Valve |
Action |
| CG941 |
Open |
| CG921 |
Open |
| CG922 |
Open |
| CG934 |
Open |
| CG936 |
Open |
- Set the Emergency Vent Line to No.1 Vent Mast Valves
| Valve |
Action |
| CG700 |
Open |
| CG702 |
Closed & Auto |
Note: The opening percentage of CG702 ranges from 0% to 100%, corresponding to a vapour outlet flow of 0 to 20,000 kg/h.
- Prepare Warm-Up Heater for Use:
- Open the warm-up heater steam inlet and drain outlet valves..
- Note: Once the process starts, a prompt will instruct the user to open the bypass valve to remove blocks.
- Prepare Generators and HD Compressor for Use:
- Ensure at least two generators are running.
- Navigate to the PMS page via the side navigation or the “number of generators running” indicator on the HD compressor page.
- Start one of the three generators not currently running. Note: By default, one generator will already be running.
- Assessment Phase – Operational flow and Assessment:
- Start the HD Compressor:
- After preparation, start the HD compressor to begin the warming-up process.
- Achieve 40°C in Warm-Up Heater Outlet Temperature:
- During warming up, the cargo tanks’ temperature will increase from -110°C to -90°C, indicating liquid conversion to cold vapour.
- Adjust the valve CG 922 to reduce the WU heater Vapour outlet temperature to 40°C.
- Maintain Cargo Tank Pressure:
-
- Observe the steady increase in temperature and tank pressure throughout the warming-up phase.
- During cargo tank warm-up, excess vapour generation can cause a significant rise in tank pressure. LD compressors may be used to redirect this vapor to the engines for propulsion.
- To start the Low Duty Compressor, first open the inlet, outlet, and main engine valves.
- LD 1: Inlet CG 901, Outlet CG 913.
- LD 2: Inlet CG 902, Outlet CG 914.
- ME Valves: CG 9105 and CG 9106.
- Once the Valves are open, click on the LD Compressor icon to access the options for starting
- In case the Tank pressures are rising further, Run the GCU as explained in the Instructional videos. Ensure the GCU inlet valve CG 940 is opened.
- Ensure temperature increases from -110°C to -90°C and pressure is stabilized to complete the exercise.
Proper line up for warming up step 1: